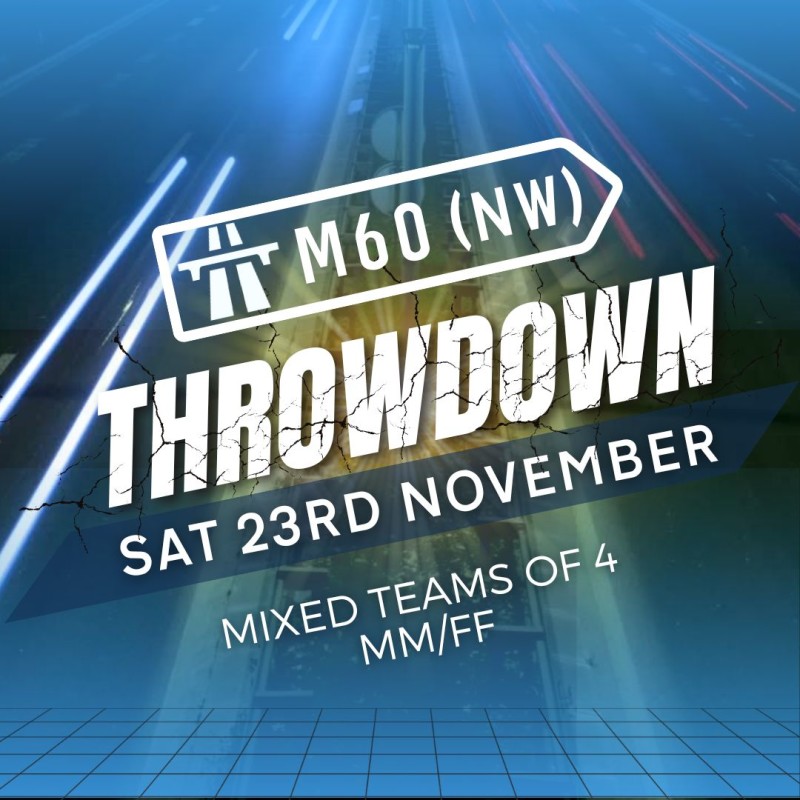
About This Competition
Calling Gtr Manchester Fitness Enthusiasts! It's time to rally your teammates and dive headfirst into an exhilarating day of functional fitness. With four fun, dynamic and diverse workouts carefully crafted to be both achievable and challenging hosted at CrossFit OL1 in Oldham.
Whether you're new to fitness or you're a gym veteran, the M60 Throwdown @ OL1 promises an atmosphere like no other fueled by awesome tunes, amazing coffee, and unbeatable vibes.
Mixed Teams of 4 - 2 Female & 2 Male
Catering to the everyday member with two distinct categories: Intermediate and Scaled.
Our Beginner category: ready to dip your toes into the world of functional fitness? this is your perfect opportunity to jump in and join the fun! Don't let inexperience hold you back. Our four carefully curated workouts are designed to be both exciting and achievable, catering specifically to those who are new to fitness comps.
Our Intermediate Category: for those who are looking to take their fitness journey to the next level. Whether you've been hitting the gym regularly or have some experience in competitive fitness, this category is your chance to challenge yourself and showcase your new skills.
So, Manchester, it's time to rally your crew, hit the M60, and make some fitness magic happen. Let's show the world what we're made of, one rep at a time!
Beginner:
Ski / Row / Bike
Wall Balls 7/5
Hanging Knee Raises
Barbell Cycling Clean & Jerk 40/20
Barbell Cycling Power Snatch 30/15
Box Step Overs 24/20 Inch
Dumbbell Movements 17.5/10
Kettlebell Movements 16/12
Single Unders
D Ball / Sandbag 30/20Kg
Confidence with Hang Power Clean and Push Press
Intermediate:
Ski / Row / Bike
Wall Balls 9/7
Toes to Bar* (2 People)
ChIn Over Bar Pull-Ups* (2 People)
Barbell Cycling Clean & Jerk 50/30
Barbell Cycling Power Snatch 40/25
Box Jumps 24/20 Inch
Dumbbell Movements 22.5/15
Kettlebell Movements 24/16
Double Unders* (2 People)
D Ball / Sandbag 40/30Kg
Confidence with Clean and Jerk variations as complexes
*Can be performed in singles / small sets
Movements not part of M60 Throwdown:
Rope Climbs / Muscle Ups - Ring or Bar / HSPU / HS Walking / Pistols / Squat Snatch / Overhead Squat
Source: Team Aretas
Your results are already here.
Every competition you've entered, ranked workout by workout. Search your name and find your entire history.
Search the ResultsThe conversation is already happening.
Athletes are commenting, posting photos, and reliving the workouts. Jump in.
See the CommunityReady for what's next?
Browse upcoming competitions near you — your next event is probably already listed.
Find Competitions Near MeHow much stronger are you than last year?
Log PRs for every lift and benchmark workout. Your progress tells the story — KettleBoards keeps track.
Track Your PRsDivisions
Top Results
Top 5 finishers per division. View full results →
| # | Athlete | Points |
|---|---|---|
| 1 | THE UNWILLING | 12 |
| 2 | FORTY 5 MASSIVE | 24 |
| 3 | ART ATTACK | 27 |
| 4 | HIGHWAY TO HELP | 37 |
| 5 | AT THE BAR | 38 |
| # | Athlete | Points |
|---|---|---|
| 1 | PETES ANGELS | 23 |
| 2 | OL1 KIDS CLUB | 24 |
| 3 | FREDDIE&JST WANNABES | 36 |
| 4 | MOTHER THRUSTERS | 40 |
| 5 | TEAM DOMINUS | 41 |
Workouts
8 MIN MAX CAL
60 Cal Bike Erg (min 10 each)
60 Sync GTOH all 4 (25/15) OR (20/10)
Max Cal Bike Assault in time remaining
8 MIN MAX CAL
60 Cal Bike Erg (min 10 each)
60 Sync GTOH all 4 (25/15) OR (20/10)
Max Cal Bike Assault in time remaining
Sandbag Symphony
8 MIN MAX SHUTTLE
BUY IN
40 Sandbag Over Shoulder 1 WORKING
50 Syncro Sandbag Squats 2 SYNCRO
Max Sandbag 10M Shuttles in time remaining (1 WORKING)
(BOTH SB HAVE TO BE OFF THE FLOOR ON SHUTTLES)
SCORE IS 10M SHUTTLES
Sandbag Symphony
8 MIN MAX SHUTTLE
BUY IN
40 Sandbag Over Shoulder 1 WORKING
50 Syncro Sandbag Squats 2 SYNCRO
Max Sandbag 10M Shuttles in time remaining (1 WORKING)
(BOTH SB HAVE TO BE OFF THE FLOOR ON SHUTTLES)
SCORE IS 10M SHUTTLES
The Worker’s March
AMRAP 8
10 Sync KB Goblet Lunge (all 4 syncro)
15 Sync SINGLE ARM KB Push Press (all 4 syncro)
20 Box Jump Over Over (SOLO 5-5-5-5)
BEGINNERS
20/12
24/16
All 4 syncro work has to performed in line formation infront of plyo box (NOT IN A CIRCLE)
The Worker’s March
AMRAP 8
10 Sync KB Goblet Lunge (all 4 syncro)
15 Sync SINGLE ARM KB Push Press (all 4 syncro)
20 Box Jump Over Over (SOLO 5-5-5-5)
BEGINNERS
16/8
20/12
All 4 syncro work has to performed in line formation infront of plyo box (NOT IN A CIRCLE)
Workout 2A & 2B
“Lift Dilemma”
his workout tests your team's strength, synchro coordination, and power output. It requires smart pair selection, effective strategy, and the ability to push through both strength and endurance elements. Each pair will perform specific lifts and max-rep efforts to contribute to the team’s overall score.
PAIR 1
Part 2A: Strength Challenge (6:00 Minute Window)
- Pair 1: Build to a 5RM Front Squat (from the rack).
- Score: Combined weight of both athletes’ 5RMs.
Part 2B: Power Output (3:00 Minute Window)
- Pair 1: Perform 15 synchronized burpees as a buy-in, then Max Thruster Reps (from the floor).
- Score: Weight x Total Reps.
PAIR 2
Part 2A: Strength Challenge (6:00 Minute Window)
- Pair 2: Build to a 1RM Thruster (from the rack).
- Score: Combined weight of both athletes’ 1RMs.
Part 2B: Power Output (3:00 Minute Window)
- Pair 2: Perform 15 synchronized burpees as a buy-in, then Max Front Squat Reps (from the floor).
Score: Weight x Total Reps.
The Rig Rebellion 🔥
Workout 3A: AMRAP Relay
This workout combines individual effort with team strategy. Each athlete will complete a 3-minute solo AMRAP, progressing through a couplet of rig/ring work and barbell power snatches. The total team score is the cumulative reps across all 12 minutes.
Workout 3B: Max Calorie Assault
A separate 12-minute block for all athletes to contribute maximum calories on the bike.
Workout 3A: AMRAP Relay
Structure:
- Time: 12 minutes, split into four 3-minute individual windows.
- Athletes tag in and out at each 3-minute interval.
- The next athlete starts from where the previous athlete finished.
Beginner:
AMRAP 4 x 3:00
- 5 Ring Rows
- 5 Power Snatch (30/15kg)
Intermediate:
P1 (0-3min) & P2 (3-6min):
AMRAP 3:00
- 5 Ring Rows
- 5 Power Snatch (40/25kg)
P3 (6-9min) & P4 (9-12min)
AMRAP 3:00
- 5 Pull-Ups
- 5 Power Snatch (40/25kg)
Workout 3B: Max Calorie Assault
Time: 12-minute window
Objective: Accumulate as many calories as possible on the bike.
Strategy: Athletes rotate on the bike as needed, managing rest and output to maximise overall calorie burn.
Media
Community
Event Details
Closes: Nov 21, 2024


Find Your Next Competition
Browse hundreds of CrossFit and functional fitness competitions worldwide.
Our goal is to bring the functional fitness competition community together. Organizing information and bringing valuable resources to the space.
Useful Links
Explore More
Competition Resources
Personal Records